
Once an inspection has been defined, it will be available to be conducted and the results recorded by selecting it from the Quality Inspection List.
The inspection could also be printed and manually recorded, then entered into the system later. Another method would be to conduct the inspection onsite and enter it directly using a touch screen.
Create a new Inspection
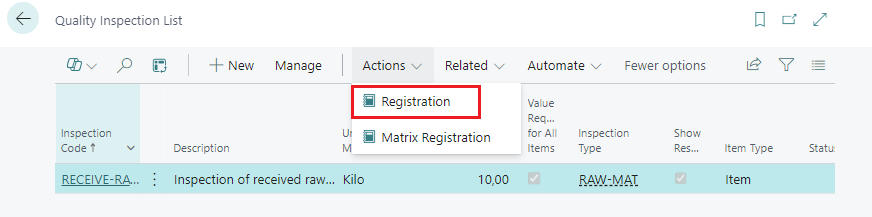
In the Quality Inspection List…
-
Find the inspection to conduct
-
Run action Registration
-
The Quality Registry Header form opens.
-
A new entry has been created with Status = Registration.
-
Inspection No identifies this inspection, it is automatically generated by a number series.

Register the Header
The Quality Registry Header is the form that is used in the beginning of the registration, i.e. to populate fields in the header.
It was opened automatically when the entry was created (see above), but if the page was closed, the registration form can be opened again from the Quality Inspection List: Locate the desired inspection and then click action Registration.
Some fields are mandatory so they should always be populated:
|
Field |
Notes |
|---|---|
|
Registration Date Registration Time |
The Date and Time of the inspection. Will be set automatically but can be changed. Type in “t” to enter the current system date and time in Date and Time fields |
|
Employee ID |
The name of the inspector. This field will be filled by default with the logged in user. |
|
Item Number No. |
Item No. must always be specified. |
Optional fields
There are several fields that can be completed in this section, but they are not mandatory and are mostly for enhanced reporting:
|
Field |
Notes |
|---|---|
|
Producer |
|
|
Lot Code |
|
|
Pallet Entry No. Pallet no Temporary Pallet No. |
To link the inspection to a pallet. |
|
Item Type |
Options: Item, Product, Raw Material, Container, or Packaging. |
|
Inspection Type |
Options: Frozen, In Process or Defrosted. |
|
Processing Method |
|
|
Origin of Raw Material |
|
|
Vessel Fishing Date Fishing Trip |
Fields used when Fishing module is utilized. |
|
Julian Production Date Production Date |
The system automatically enters the Production Date according to the Julian Date entered. |
Lot Code
It is not mandatory to choose a Lot for the inspection as an inspection can potentially be done, for example, on a Fishing Trip that has not yet been graded and/or lot designated. Please note, however, that the main traceability between the inspection and the item being inspected is via a Lot. In this scenario, it is desirable to Confirm the Inspection but not post it. It can then be re-opened and a Lot assigned, when known, before posting.
Automatic fields
The following fields will be filled based upon inspection content and status:
|
Field |
Notes |
|---|---|
|
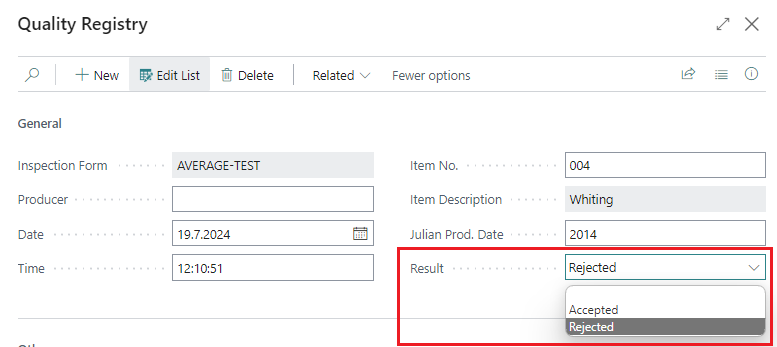
Results |
After recording the Inspection, the results are marked as either Accepted or Rejected before closing. |
|
Status |
The Status will initially be set to Recording. After completion, it will have a status of Confirmed. The final status, after all has been verified and the inspection has been posted, the status will then be Posted. |
|
Comment |
Shows a checkmark if a comment has been saved on the inspection. |
|
Comments on Lines |
Shows a checkmark if a comment has been made on an individual line in the inspection, such as a required response for an out of bounds parameter, for example. |
Record the Details
The next step is to record the actual inspection:
-
Press the Recording button and record the actual inspection items in the subsequent Quality Registry form.
-
Enter the inspection results for each item in the Response field.
-
If you enter a Response for an item that is out of the specified acceptable range, you will be prompted to enter comments via the Quality Comments form (if required in the Quality Item setup).
-
Enter your comments
-
Click <Esc> to return to the Quality Registry Lines form.
-
If set up in the system, a corrective action may also be displayed when an out of range value is entered.
-
-
To attach a photo to inspection you can click on the Links on the right hands side of the page, select the line and click New. Make sure the image is on a common drive that those who need to have access to. Find the image and attach.
Add Comments
When you have finished entering your Inspection information, you can also enter additional general comments by opening the Quality Registry Navigate bar and choosing Comments. Both individual line comments and general comments can be viewed by selecting Comments or View Line Comments from the Form sub-menu on the Quality Registry Header.
Set Results
The result of the inspection should be either Accepted or Rejected. In some work process, it might be okay to leave the field empty instead of setting Accepted for every inspection.
Rejecting an Inspection
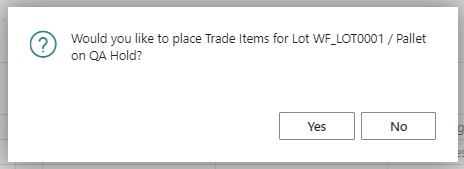
If you have completed a Quality Inspection and, as a result, need to reject the Lot being inspected…
-
In the Result field in the Inspection Header, choose Rejected from the drop-down menu.
-
When rejected, it depends on the setting in Quality Setup what happens to the lot or pallet
-
The Trade Items will get Hold Status as QA Hold.
-
If the Trade Items were already reserved for an agreement, this would not be possible and an error message will pop up.

Confirm
When all is done…
-
Close the form, the system will suggest the confirmation
-
Click Yes to confirm the inspection.
GÆÐASKRÁNING STAÐFESTA SKOÐUN OPNA SKOÐUN