
Data from Wisefish and Business Central can be sent to the MES system as XML documents via service bus messages through Azure. There are a few different ways to use this:
-
For all tables, the whole contents can be sent directly from the External Message Setup.
-
The item master can be sent from the Items list, with a pre-selected range.
-
For selected tables that have an active change log (see APIs Base Setup), updated entries can be sent from the Change Log page.
-
Finally, sales orders that items need to be produced for. This has been implemented for Delivery Agreements in Wisefish. In this case, there is an option to send automatically at release. For this message, the contents of the messages comes from from multiple tables.
Setup
The setup is done on the following pages in Wisefish:
-
Wisefish APIs Base & Setup has some basic settings to active this functionality.
-
The Stock Centers that stand for for the production factories get their own service bus queue.
-
External Message Setup has the list of tables that are sent
-
For each table, the fields to be sent are selected in the list External Message Fields
Service Bus Queue and Saas Token:
-
When sending data on table level, for example from the Change Log - the system uses the Service Bus Queue and Saas Token defined on the Wisefish APIs Base Setup card.
-
When sending Delivery Agreements (sales orders), each of them is intended for a specific stock center, so the Service Bus Queue and Saas Token is derived from the Stock Center card.
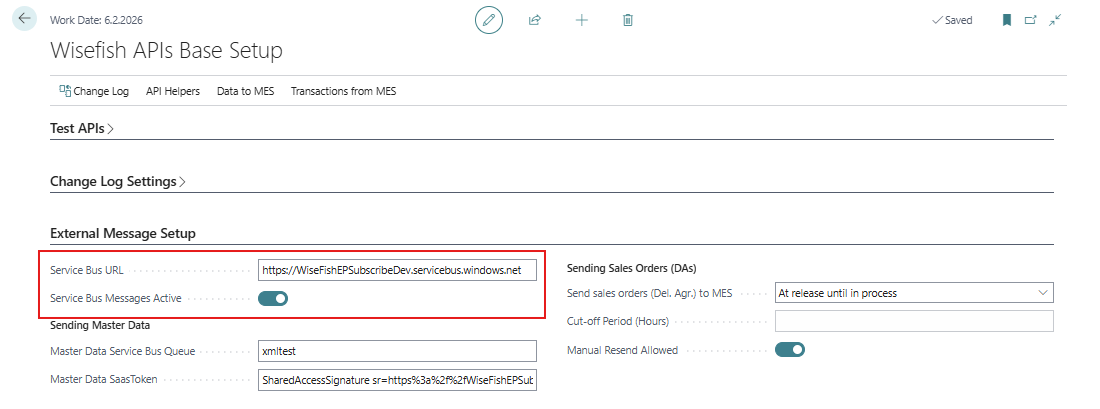
Wisefish APIs Base Setup
The main settings for this feature are on the tab External Message Setup on the page Wisefish APIs Base Setup.
|
Field |
Description |
|---|---|
|
Service Bus URL |
The service bus message URL. This is general for all messages. |
|
Service Bus Messages Active |
This checkmark is needed to turn on the messages. If all messages need to be stopped, simply remove this checkmark. |
|
Master Data Service Sub Queue |
The queue to use when sending data from the Change Log, like masterdata. Note: This is not used when sending sales orders, because each sales order belongs to a Stock Center. |
|
Master Data Saas Token |
This is needed for authentication into the service bus. |
|
Sending Sales Orders (Del. Agr.) to MES |
This option controls when released Delivery Agreements are automatically sent as sales orders to the external manufacturing system (MES). Options are:
|
|
Cut-off Period (Hours) |
Cut-off time is calculated as the shipment date (at noon, 12 pm), minus the number of hours in this field. For example: “Cut-off Period (Hours) is set as 18 hours. => Noon on shipment date minus 18 hours = 6 pm. => Cut-off time is at 6PM on the day before shipment date. This means that a DA will be sent as an order to MES at every release, up until at 6 PM before shipment date. |
|
Manual Resend Allowed |
A checkmark in this fields allows the user to resend an order which has status “Sent to MES”. This is be done in either
|
Stock Center
For each stock center that has a MES system that needs to receive sales orders (Delivery Agreements) as XML messages, the service bus queue needs to be configured as well as the connection information and authentication for it. These fields are in a new tab at the bottom of the Stock Center page:

Example:
The SAS token looks like this:
SharedAccessSignature sr=https%3A%2F%2FWiseFishEPSubscribeDev.servicebus.windows.net%2Fsomequeue&sig=0bDte%2FbvqCTl9CRGv2Z4G8wjsahF0BZ6Vhyg0xKgN8I%3D&se=2397206944&skn=BCIntegrationSend
External Message Setup
Under the Wisefish APIs setup page there is a button to open the External Message Setup.
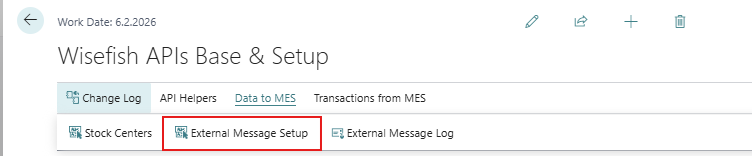
This opens a list of all defined message types, where each of them is related to a single table in the database.

Sales Order message for a Delivery Agreement is directly linked to the “Sales Agreement Header” table which is the table behind the header. But the message also shows data from the following tables, which then also need a setup in this list:
-
Sales Agreement Header
-
Sales Agreement Line
-
Customer
-
Item
External Message Fields
Drilling down from field No. of Fields will open up the field selection for that specific table.
|
Field |
Description |
|---|---|
|
Node Name |
This value will be used as a node name in the XML file |
|
Field ID |
This is the ID of the field in the table in BC. This should be left blank if the node shall contain a fixed value, instead of a field value. |
|
Field Name |
Shows the name of the field selected with the Field ID. |
|
Fixed Value |
If there is no Field ID, the fixed value is typed into this field. |
|
Disabled |
Checkmark in this field will disable it, so it is not included in the XML file. |
Example
On the snapshot below, the Item table number 27 has 5 fields configured for xml:
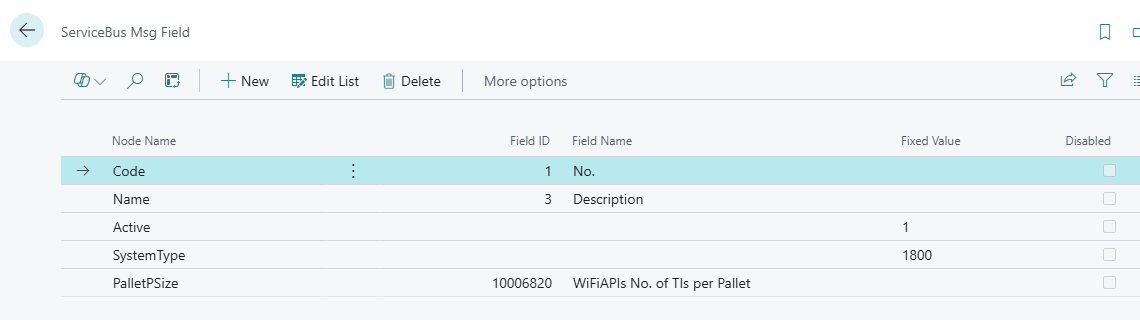
This list defines the XML node names and then you select the field ID from the Item Table, so for the first line we have configured the field No. to be a part of the XML but it should be named “Code” in the XML file. You can also add non table bound fields like the field SystemType that is just the entered value 1800.
This configuration will produce the following XML for one entry in the table:
    <Object DataType="Marel.Mp6.Process.Materials.MaterialRecord">
      <Properties>
        <Code>HSS1-0405</Code>
        <Name>Salmon Fresh HOG Superior 4-5kg</Name>
        <Active>1</Active>
        <SystemType>1800</SystemType>
        <PalletPSize>30</PalletPSize>
      </Properties>
    </Object>
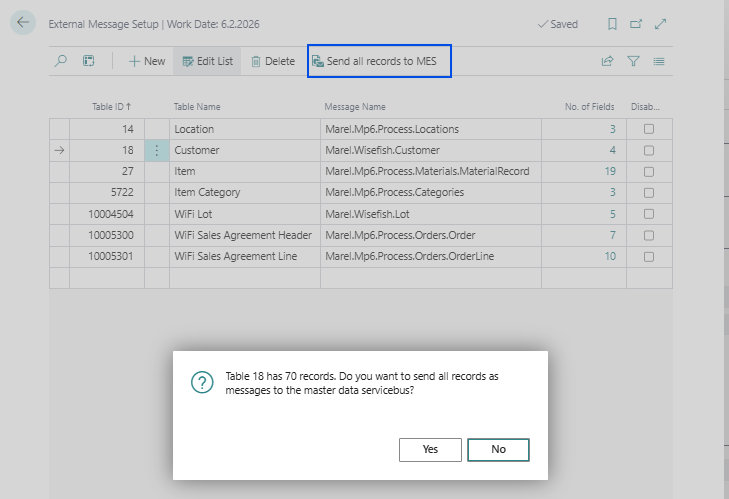
Sending a Table to MES
From the External Message Setup, the whole contents of a table can be sent to the MES:
-
Create a message setup for the required table, if it does not already exist
-
Drill down the No. of Fields and set up the nodes
-
Click Send all records to MES
A confirmation pop-up will tell how many records/messages are going to be sent.
All sent messages will be logged in the External Message Log
Message Log
Every message sent is logged in the list called External Message Log.
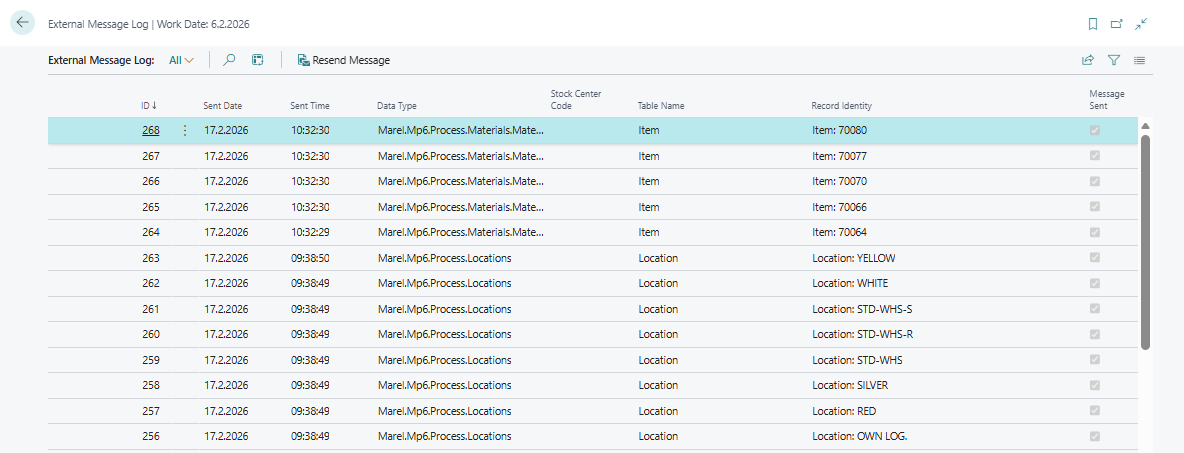
-
All entries get Sent Date and Sent Time, no matter what happened on the service bus side.
-
For messages that were successfully received by the Service Bus, the field is marked with Message Sent.
Resend Message
An action on this page can be used to resend messages, or for testing purposes, i.e. just view the content of the message that would be sent.
When resending a message from the Change Log, it will contain data from the record field values as they are now, since the system is not keeping a copy of the old values of the data fields.
Sending data from Change Log
On the base card, the APIs change log can be activated for specific records:

When changes have been done on these table, entries will exist in the APIs Change Log. From this lists, messages can be sent for each entry.
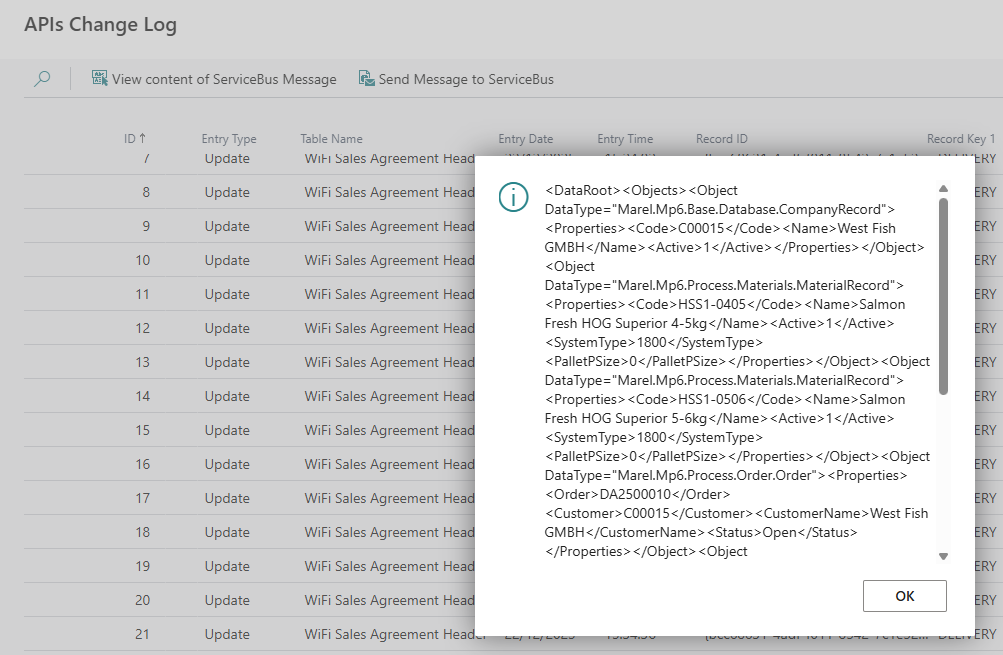
Actions on this list:
-
Send Message to ServiceBus
For the selected record, send a message.
The message will contain data from the record field values as they are now, since the system is not keeping a copy of the old values of the data fields.
-
View content of ServiceBus Message
This action will only combine the message and show it in pop-up. This can be used to check if the field setup has been done because this will show an error if some data could not be retrieved. When running this action, the message is not logged in the Message Log.
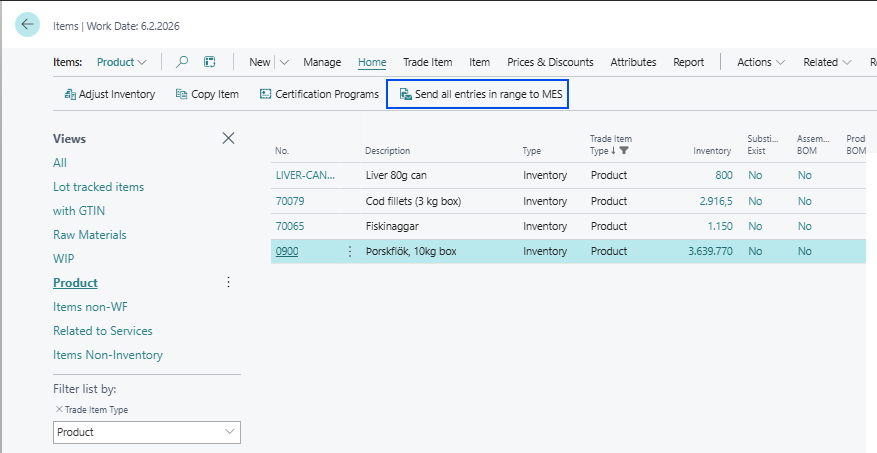
Sending item master to MES
For the Items list, there is a specific action to send to MES.
-
Create a message setup for table 27, if it does not already exist.
-
Open the Items page and set the desired filter
-
Click Send all entries in range to MES
A confirmation pop-up will tell how many records/messages are going to be sent.
All sent messages will be logged in the External Message Log
Sending sales orders to MES
Currently the sending of sales orders (Delivery Agreements) can be automated in the system.
This is described in subchapter Send Sales Orders (DAs) to MES